How to Build a Full-Featured Car Rental Website: A Practical Guide
Published: 25/03/2026
Building a robust car rental platform requires balancing user experience, operational efficiency, and scalability. Drawing from the Wanaka Car Rental system, this guide walks through the core components and best practices to create a professional rental website.
1. Core Architecture & Tech Stack
A modern car rental site needs a solid foundation to handle bookings, inventory, and admin workflows. For a solution like Wanaka Studio’s car rental platform, we recommend:
- Backend: ASP.NET Core (for secure API development and database integration)
- Frontend: Responsive HTML/CSS/JavaScript with Tailwind CSS for mobile-first design
- Database: SQL Server (to manage vehicles, orders, customers, and availability)
- Hosting: Windows Server/IIS (ideal for .NET applications)
- Payment: PayPal/Stripe integration for global transactions
This stack ensures your site can scale from small operations to enterprise-level rental networks while maintaining security and performance.
2. User-Facing Booking Flow
The booking process is the heart of your rental site. A streamlined, intuitive flow directly impacts conversion rates.
Step 1: Search & Availability
Start with a prominent search bar on the homepage, letting users input:
- Pick-up/drop-off locations (supports same-site or one-way rentals)
- Rental dates and times (down to the hour)
- Optional filters for vehicle type, brand, fuel type, or features
The system should instantly query the vehicle inventory and display only available options for the selected period, preventing double-bookings.
Step 2: Vehicle Selection
Present results in a filterable, sortable list with clear vehicle details:
- High-quality images, make/model, and key specs (seats, doors, luggage capacity, transmission)
- Daily/weekly/monthly pricing
- Fuel type and mileage options
- "Select" buttons to move forward
Users can compare options at a glance, with sorting tools (price, popularity) to refine their choices.
Step 3: Add Extras & Insurance
Once a vehicle is selected, guide users to customize their booking with add-ons:
- Child seats, additional drivers, GPS, or unlimited mileage
- Insurance packages (Collision Damage Waiver, theft protection)
- Clear per-day pricing and tax calculations
A real-time price summary updates as users select options, showing base rental, extras, taxes, and the grand total—transparency builds trust.
Step 4: Checkout & Confirmation
Collect essential customer details (name, contact, address) and offer payment options:
- Pre-payment via credit card/PayPal
- "Pay on pickup" for flexibility
- Order summary review before submission
After confirmation, generate a printable PDF receipt and send email/SMS notifications to the user, with links to modify or cancel the booking (per your policy).
3. Admin Dashboard & Operational Tools
A powerful backend ensures your team can manage rentals, vehicles, and customers efficiently.
Dashboard Analytics
A central dashboard provides at-a-glance insights:
- Registered users, store locations, and vehicle counts
- Monthly blog/news post trends
- Rental equipment breakdown (by type and availability)
- Total orders and revenue metrics
This helps managers track business performance and identify opportunities.
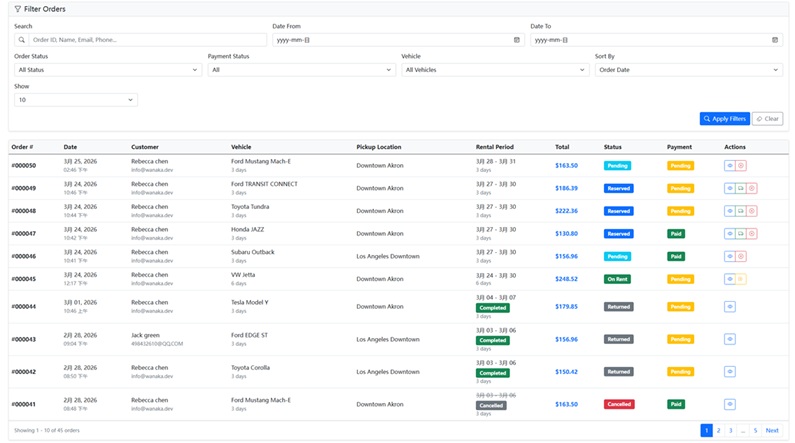
Order Management
- Order List: Filter by status (Pending, Reserved, On Rent, Returned, Cancelled), date, or customer
- Order Details: View full vehicle, customer, and pricing info; update payment status; add notes
- Schedule View: A calendar-based schedule to visualize vehicle availability, preventing overlaps and simplifying rescheduling
Vehicle & Customer Management
- Vehicle Inventory: Track make/model, license plates, maintenance status, and pricing rules
- Customer Profiles: Store contact info, rental history, and verified documents (like driver’s licenses)
- Request Handling: Manage customer inquiries and support tickets
4. Key UX & Technical Best Practices
Mobile-First Design
Over 60% of rental bookings happen on mobile devices, so your site must be fully responsive:
- Collapsible navigation menus
- Touch-friendly buttons and form fields
- Simplified booking flows for small screens
Multi-Language & Currency Support
For global markets, implement:
- Language switching (English, Spanish, French, etc.)
- Dynamic currency conversion
- Localized date/time formats
Security & Compliance
- GDPR/CCPA-compliant privacy policies
- Secure payment processing (PCI DSS standards)
- Data encryption for customer and payment information
- Clear terms of service for rentals, cancellations, and refunds
5. Scaling & Growth
As your business expands, add these advanced features:
- Loyalty Programs: Reward repeat customers with discounts or free upgrades
- Fleet Management: Track vehicle maintenance, fuel levels, and depreciation
- Reporting: Generate custom reports on revenue, utilization, and popular vehicles
- API Integrations: Connect to third-party tools (CRM, accounting software, or travel platforms)
Conclusion
A successful car rental website combines a seamless user booking experience with a powerful admin backend. By focusing on clarity, transparency, and operational efficiency—like the Wanaka Car Rental system—you can build a platform that drives conversions, simplifies management, and scales with your business.
Whether you’re launching a small local fleet or a national rental network, this framework provides the foundation to create a professional, reliable car rental website that meets both user and business needs.